And the answer is… The API can be anywhere, and a new Function App has been set up for the rest of the API development (well, the old version is still up so the link in a previous post still works). On top of that proxies have been set up to the subdomain api.mywinedb.org, so all future API calls will be of the form https://api.mywinedb.org/EasyToReadApiMethodThatMakesSenceToAnyone (non-functioning link)
While the bulk of this post will talk about how to Obfuscate the Azure Function calls into a meaningful Api call from the subdomain…A few quick announcements:
- The API project is now public! Yes, following along in the code is now possible from this point on…At least in the “Backend” (stuff that happens on the server). The API calls have been documented (gasp! what’s that) in the project wiki. Check it out at: https://github.com/boydtwa/MyWineDb.Api/wiki
- The “customer’s” (that’s me) number one goal, which was to produce a report that itemizes all of the wine in the cellar(s) and place a value on it was achieved. It can be viewed at: https://api.mywinedb.org/InventoryReport This will be temporary because the next task will be to take these function calls and convert them so only an authorized user can use them. But that will be another story for another day.
The first thing to do is make a proxy for each of the api functions. This can be done by creating a proxies.json file in the project (see: https://github.com/boydtwa/MyWineDb.Api/blob/develop/Api/proxies.json )
A typical proxy looks like the following:
{
  "$schema": "http://json.schemastore.org/proxies",
  "proxies": {
    "GetCellarsProxy": {
      "matchCondition": {
        "methods": [ "GET" ],
        "route": "/CellarList"
      },
      "backendUri": "https://%API_HOST%.azurewebsites.net/api/GetCellars?code=%GET_CELLARS_CODE%"
    }
}
This proxy creates a new url for the GetCellars api so what was the backendURI becomes https://%API_HOST%.azurewebsites.net/CellarList which is still pretty ugly. You may be wondering what %API_HOST% and %GET_CELLARS_CODE% are. They are references to Azure Function App Configuration Settings that have been created. On the Azure Portal they can be found by selecting the Function App and clicking the Configuration link in the left hand navigation. It looks like the following:
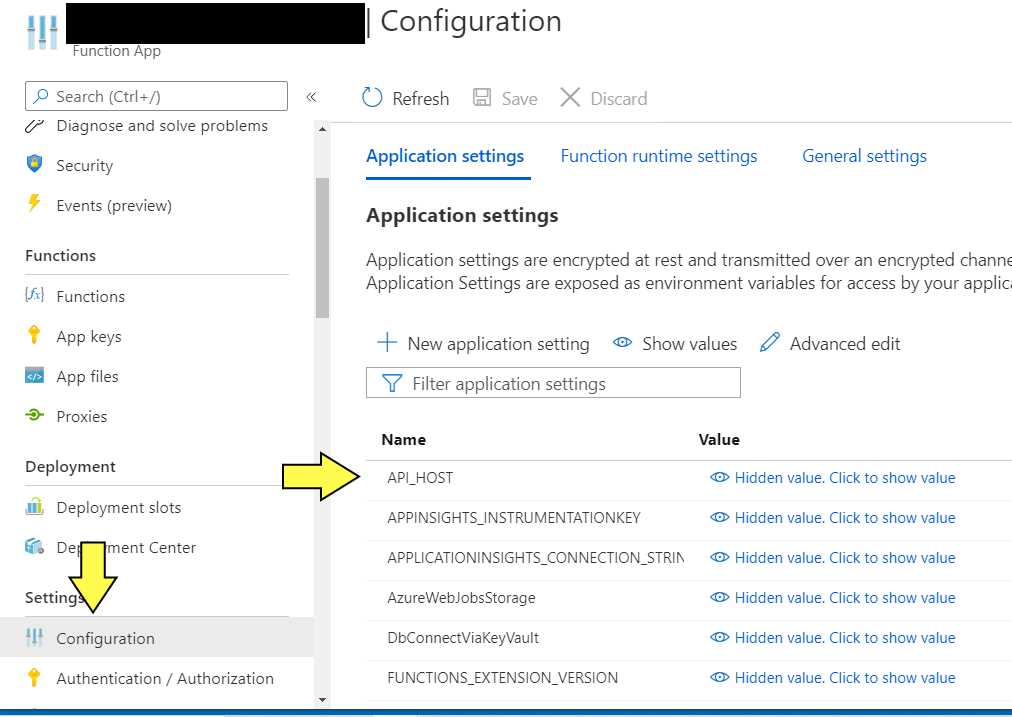
This is significant because it frees the developer to work on version 2 of the API function or a bug while version 1 continues to serve its applications and when version 2 is ready it can be activated by changing the Configuration value for %GET_CELLARS_CODE%
Up next is some DNS work to create the subdomain and Azure makes it pretty easy. The “api” subdomain has already been created and is pointing to this function. So another subdomain will be created and point it to the old API function that has been abandoned. This subdomain will not exist past writing this blog as the certificate purchased does not cover this subdomain. A word to the wise get the SSL certificate prior to starting this exercise as the process takes a couple of days (assuming a “trusted” certificate is desired so will not incur any additional effort when accessing the subdomain). A certificate can be obtained from Microsoft and they make it super easy to do so. But this author is a cheap S.O.B and it was obtained from another provider.
First a CNAME record must be created to establish the sub domain and it needs to point to the root of the Function API URL (https://%API_HOST%.azurewebsites.net).
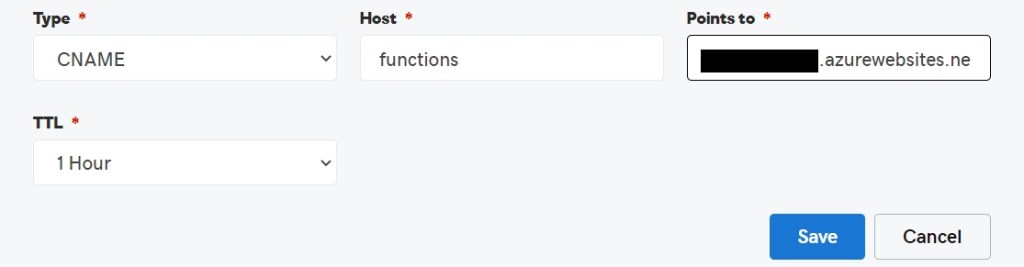
Since the DNS has no clue what %APP_HOST% is the real value needs to be supplied here.
Return to the Azure Portal where the rest of the process can continue. Clicking Add Custom Domain the following appears:
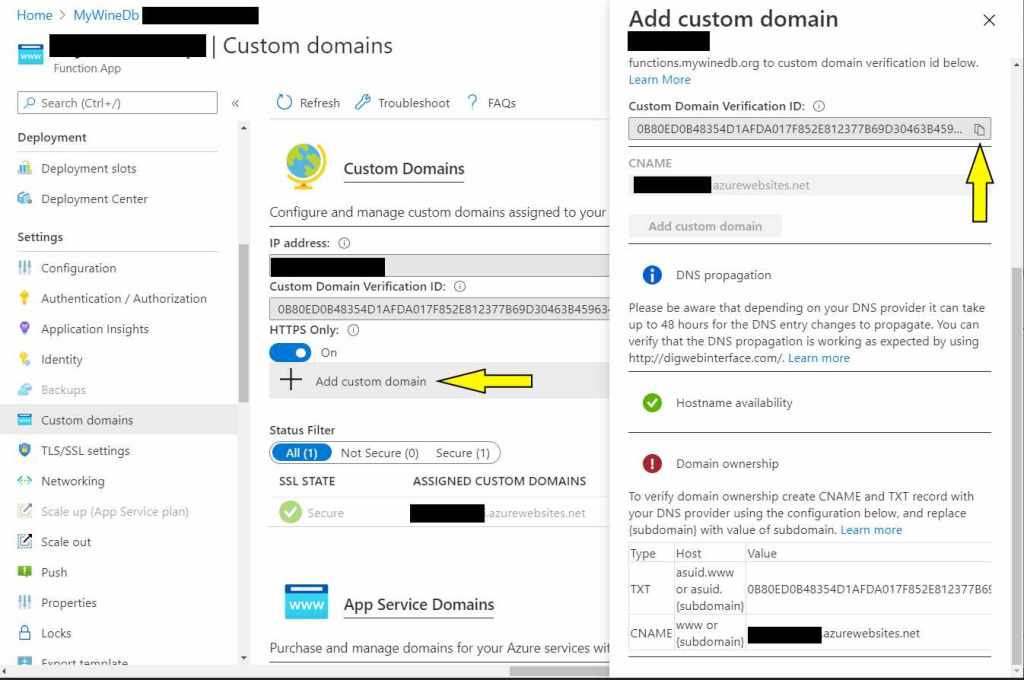
This could have been the first step, however, for demonstration purposes, the status indicators are shown that the process is partially complete as it recognizes the host name and the fact that it points to azure. But, Azure still doesn’t know if it trusts that the owner of this Function App owns the domain. Azure requires a TXT record in the DNS with the value of the Verification ID. Microsoft provides a copy to clipboard button which saves time cause no-one can memorize that ugly beast. Back out of this by clicking the “X” at the top of the flyout. Go back to the domain DNS and add a text record for asuid.functions.<your domain>, return to the Azure Portal and click add subdomain again. The check icons should now be green. Click the Add Custom Domain button and a new line item appears in the list of domains

The last step in this process is to attach the SSL certificate to this sub domain. Click Add binding. Notice the button Upload PFX Certificate. Before going there. is a “PFX” file of the certificate in the possession of the reader? Unless the reader is a Network Administrator by trade (and this author is not) the answer is probably no. This author didn’t have one and getting it was quite the experience. When the certificate was purchased the provider sent a “private key” almost immediately. But, the provider wanted a way to verify ownership of the domain the certificate before they provide the rest of the goods. The provider offered two options create a text file on the hosted domain (this subdomain is not hosted as it was just pointed it to Microsoft) which was not an option. Or add some cryptic record in the DNS that they could check. This author is unsure if this is standard operating procedure for all SSL certificate providers, so no further details of this experience will be provided. A couple of days later all was good and the goods in the form of a .p7b file was in hand. The certificate provider offered a URL where the .p7b file could be signed with the private key which produced the .pfx file Azure wanted.
With the .pfx file in hand return to the Azure portal, navigate to the Function API, click Add binding and click Upload PFX Certificate in the flyout, navigated to the file the client computer and provide the provided the password set on the site that created the .pfx file. Click the Upload button. Demonstrating the functions.mywinedb.org link can not be achieved because Azure didn’t like the fact that the certificate did not match the custom domain it was uploaded for and therefore didn’t bind it to the custom domain. So with a little imagination this author will present what the line item for api.mywinedb.org looks like after the certificate was successfully adding.

With a little snooping in the Git Hub project a .json file for Postman with the localhost set up for the API function calls will reveal what it takes to activate them. The proxies.json file in the project identifies the URLs that runs them. However, as stated above, the next post will discuss securing them with user authentication and free use of the author’s API will come to an end. But, if so inclined, fork the project.
