
I thought it would be an easy extension of my custom domain, with proxied URLs for the Function API to include authentication. NOT! At the time of this writing I am half way to my objective. I can authenticate and retrieve (or submit) data from/to the API using Postman. But as of today I can not say the same in my Xamarin app. Furthermore, getting Postman (a Google App for configuring web requests to get responses from things like API’s, i.e., when you want something other than a web page from a server) to work was no easy exercise and I had to break down and call Microsoft for help.
First off, I’d like to say that I have never had a bad experience with Microsoft support. And, I have called upon them several times in my multi-decade relationship with Microsoft products. I raised the issue on Sunday, and by Monday they were on the phone with me. Three hours later (I am glad I am not the only one who has difficulty with this), the two support technicians working with me came up with a solution. Before, I called them, I searched the web in efforts to get a solution on my own, the only examples would connect to Microsoft Graph. Graph is a major sink hole for getting and reporting data so it will let anyone in under almost any circumstances. Function Aps, which are a “special” class of Web App are a different story, and contrary to what the code “implies” about each function call and the multiple choices for Authorization that can be ascribed to each of them, in the end you have to secure the Function App. This means all API calls contained in the “App” either have authentication or are anonymous. I should caveat this by saying there is an Azure feature that can serve the individual API Calls with different types of authentication for each call (API Management Services), but, it has a daily cost, regardless if it is used or not, so I am not interested in that approach.
The approach I am interested in takes a bit lot to configure but, in a nutshell the steps are:
- Register an Active Directory App for Postman
- Require Authorization for the Function API
- Give the Postman AD App access to Function API as a “Contributor”
- Configure the Postman Client
- Example API Call
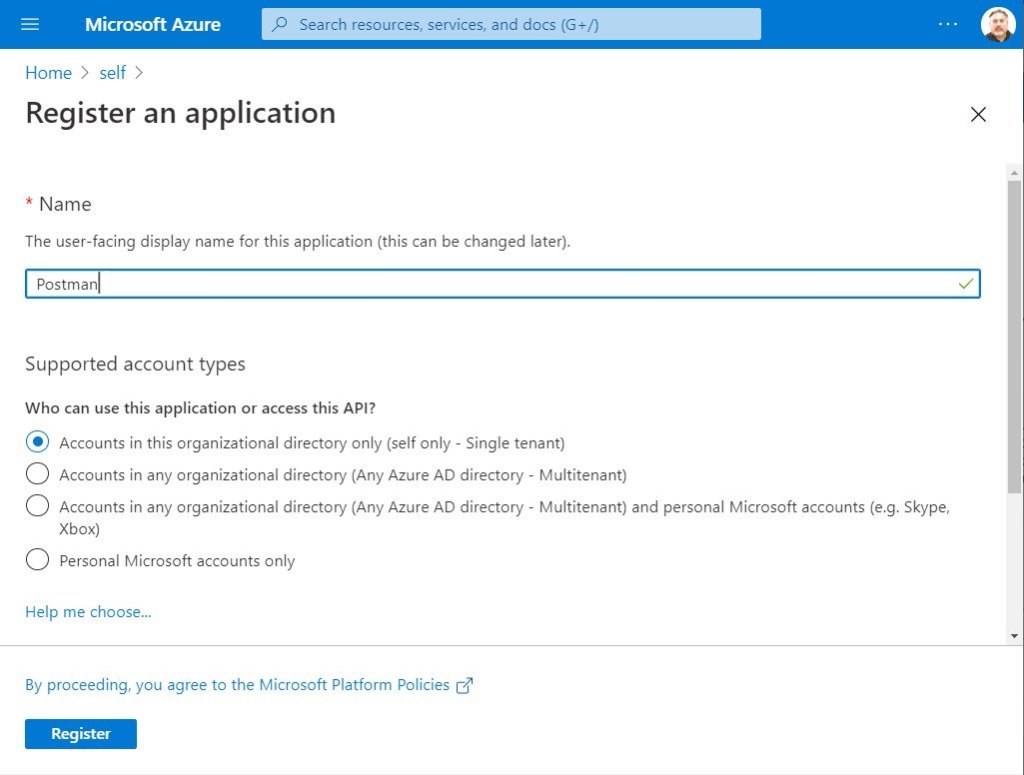
Register an Active Directory App For Postman
Starting from Home in the Azure Portal select Azure Active Directory and then App registrations in the left hand menu. Then select the + icon next to New registration.

As an aside don’t you love those purple announcement boxes, I feel this post is getting stale already when I see them.
Fill out the registration form for the app as follows.
Capture it’s “Application Id”
After clicking the Register button it will return to a page like the following:

copy the application id and save it somewhere. It will become a parameter called client_Id in Postman.
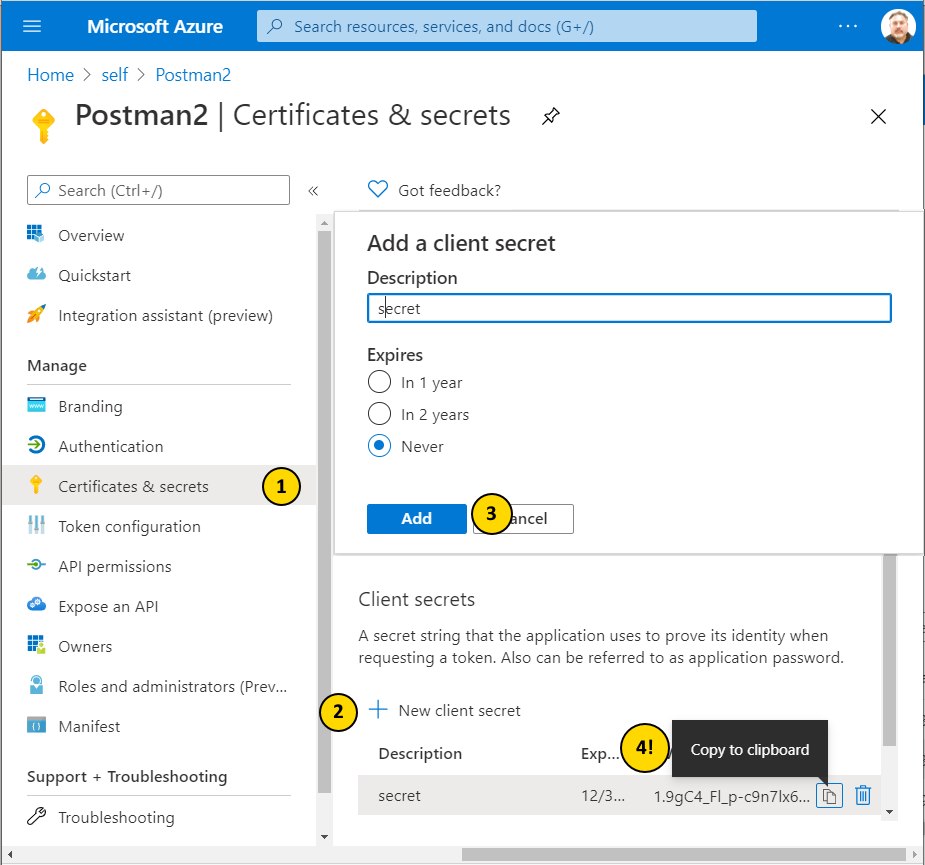
Create a Secret for the Postman AD App
Note the 4 steps in the following picture. Pay attention to step 4 as it will be the only time you will be able to get the secret value which you need for the parameter client_secret in Postman
Require Authorization for the Function API
Return to the Home screen and find the Function API and click its link
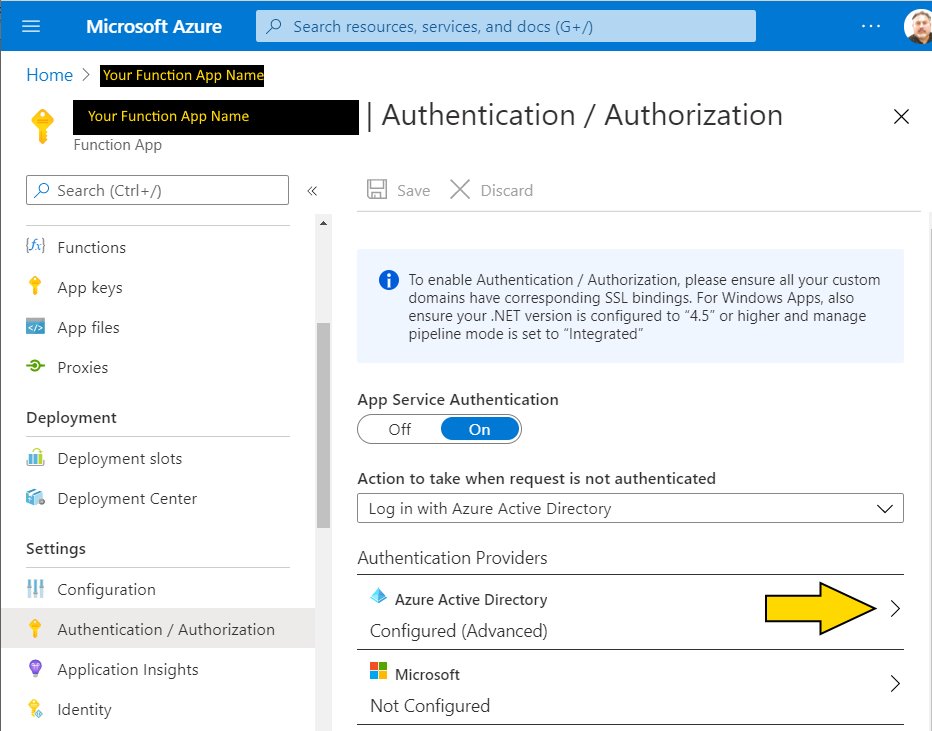
After clicking the Authentication / Authorization link in the left hand navigation slide the App Service Authentication button to On. Then pick Log in with Azure Active Directory from the drop down for Action to take when request is not authenticated. Finally click the > symbol on the right side of the Azure Active Directory item in the Authentication Providers List.
Configure “Azure Active Directory” for the Function API
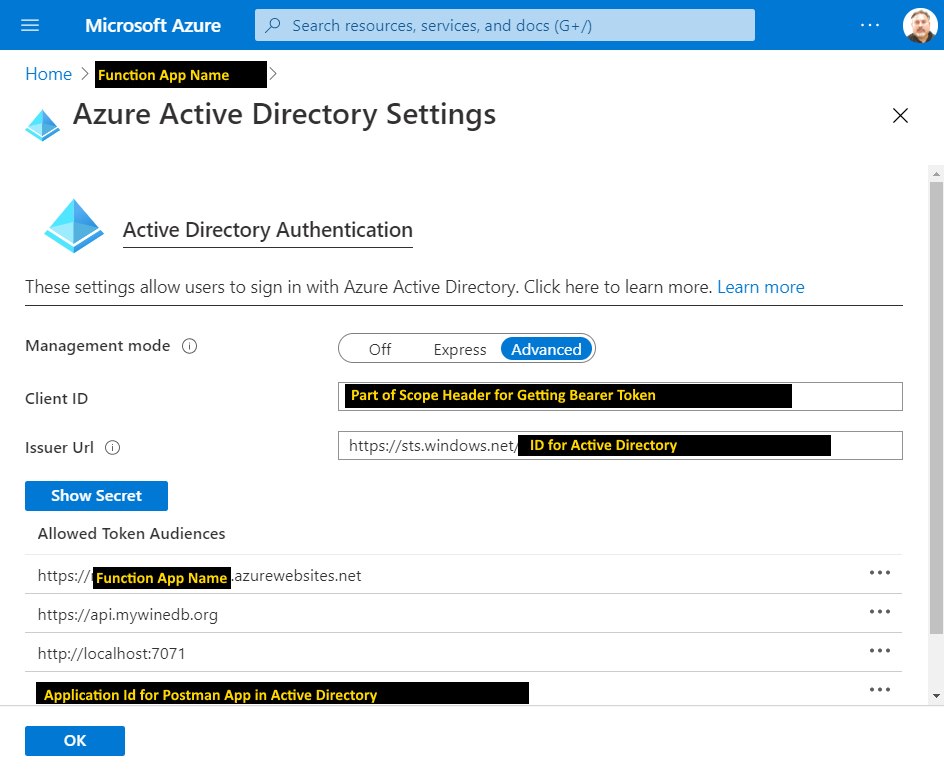
This screen shot is not as clean as I would like it to be and it has remnants of failed attempts. The support staff used the Express set up on their system but I had already chose Advanced and added details in previous attempts. The important takeaways from this screen are
- The Client Id as this will be part of the scope parameter in Postman (hint: copy and save this)
- I think the first entry for Allow Token Audiences is created for you. If you don’t see it then add it.
- The second entry is for my custom domain that hosts the API calls
- The third entry is not necessary (all of the API method classes can be Anonymous which is an added benefit when debugging locally)
- The fourth entry must be added. Its value was copied earlier and identified as the client_id
Give the Postman AD App access to Function API as a “Contributor”
There are three places where you can grant access for the Postman AD application. It can be done at the subscription level, the resource level and the Function App level. I have chosen the Function App level as I don’t want to give too much permission to the service app credential. Navigate back Home and select the Function App.
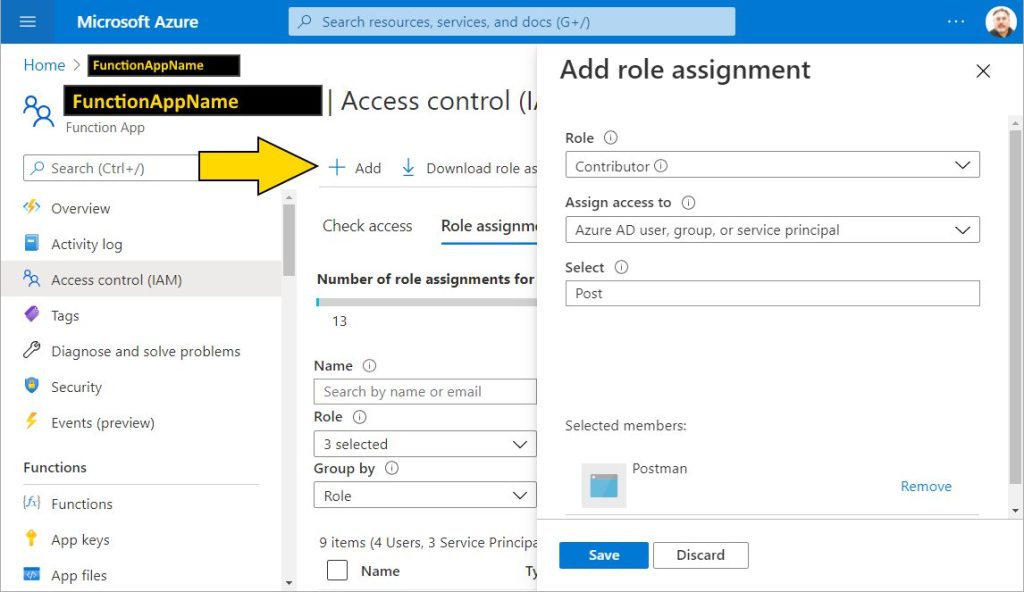
After clicking the Access control (IAM) link on the left hand navigation menu. Click the “+” icon to Add an assignment. Select Contributor from the Role dropdown menu. In the Select text box start to type “Postman”. When it appears below the text box click on it and it moves to the “Selected members” section. Click the Save button and navigate to Home
Configure the Postman Client
There is a two step process to get results from the Function App in Postman the first step is to get a Bearer Token from the Azure Active Directory and then use that token in an Authorization header for the API Call. It is best that a Postman environment is created to store the values we have been collecting. Click the last icon on the right just below the black bar and then click the add button. Provide an environment name, in my case I called it postman. I then populated the following variables (substitute the real values where you see <description>).
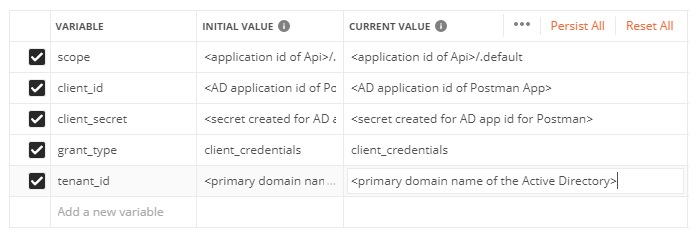
A couple of notes: Yes that really is a period after the forward slash in scope. and the primary domain name is usually your azure login email name with no periods or special characters (e.g. an azure login account of john.doe@google.com would become johndoegoogle.onmicrosoft.com). If you right-click on your picture (or person icon) in the top right the popup will have this value in it.
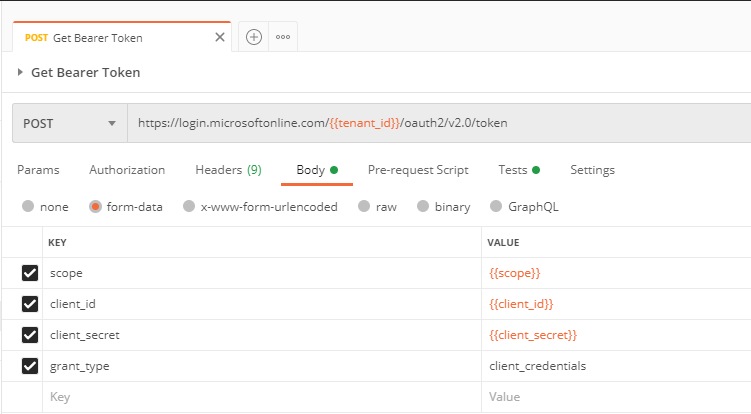
Using this environment create a POST request to retrieve the bearer token. as follows
One of the most useful things I found in my futile search to solve this problem was a video from Microsoft (https://www.youtube.com/watch?v=ujzrq8Fg9Gc) and while the approach in this video did not work for me. It did show me a “Test” script that is quite handy.
var json = JSON.parse(responseBody);
pm.variables.get("variable_key");
tests["Get AAD Token"] = !json.error &&
                         responseBody !== '' &&
                         responseBody !== '{}' &&
                         json.access_token !== '';
postman.setEnvironmentVariable("bearerToken", json.access_token);
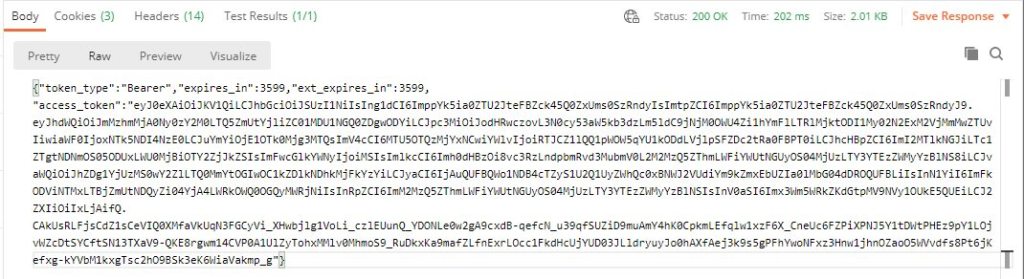
What it does is when the token is returned (access_token) it loads that value in to the Postman environment (as bearerToken) so you are set up for the next call. And that is a good thing, because it is easy to mess up a manual copy and paste of this value. The response from the “Get Bearer Token” call looks like.
If you want to know what that token contains there is a nifty site https://jwt.ms that can decode the token for you. I have to laugh because, at the time of this writing the site has an invalid SSL certificate because it expired in the middle of this holiday weekend. If you are a system administrator with any years under your belt you have been here.
Example API Call
Finally we can make the API call. If you stuck with me to this point; Thank You! I hope this will be the longest blog I ever write. But I also hope it helps someone who has struggled with this as well.
The set up for the api call is:
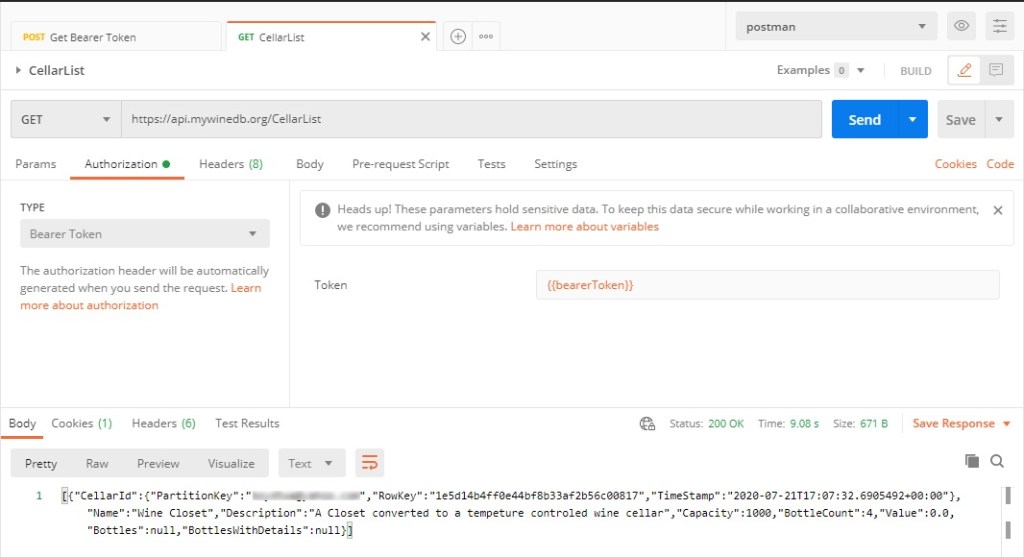
Simply click the Authorization Tab and select Bearer Token from the pull down list and click Send.
So I am half-way home. I still need to authenticate in the Xamarin Application. If anyone has a clue for that let me know. The Microsoft examples are not working for me (at least in my API…yet).
