
It has been quite a while since my last post and it has taken a long time to finally overcome the authentication and authorization process for my mobile application and get it working. As I documented my knowledge this post quickly got out of hand and so I am breaking up the information into into two posts.
Why is this so difficult…? A question every Microsoft developer utters at least once and more often then they want to. The answer this time is… There is a lot happening in the Microsoft world and not all parts of it are in sync at the moment namely Xamarin Forms and MSAL (Microsoft Secure Authentication Library). MSAL is a relatively new library that Microsoft is using to “help” ease the authentication and authorization process for all types of applications. At the time of this writing Microsoft is racing to release an update to the .Net stack which includes a new version of C# (9.0) and a unification of the .Net Framework (.Net 5, a one framework to rule them all kind of thing). They are targeting a November 10th release date. Microsoft has also announced a plan to unify all User Interface creation in to a new form of XAML called MAUI (Multi-Platform Application User Interface) and it too will be the only way to make a UI for any kind of application in the future. Most of this work could best be summarized as Xamarin Forms vNext. So with all this activity going on not much has been documented on how to do what I want to do (Authenticate and Authorize my Xamarin Forms App to my Azure API functions.). But, I have succeeded and I dedicate this and the next post to describe how it works. In the end I will publish a bare bones mobile app that will work with the already published API project so intrepid programmers can have a working example. For now this post will cover:
A New Mobile App Project and What it Contains
The first thing I did was create a new Xamarin project. In my haste I had tried several approaches to this problem and I felt I needed to start with a clean slate to see if I could do it again and identify what I could remove from my real project. I started with a “Flyout” Xamarin Project and limited it to Android.
I then created empty files for the following:
- View Pages (with supporting “.cs” code behind files)
- CellarPage.xaml
- LoginPage.xaml
- View Models
- CellarViewModel.cs
- LoginViewModel.cs (with interface ILoginViewModel.cs)
- Services
- WineStore.cs (with interface IWineStore.cs)
- MicrosoftAuthService.cs (with interface IMicrosoftAuthService)
- Messaging.cs (with interface IMessaging.cs)
- Models
- AzureTableKey.cs
- BottleBriefModel.cs
- CellarListItem.cs
- CellarSummaryModel.cs
- Item.cs
- User.cs
Code and library references were then added to these project files. I also incorporated MVVM Light, a library for dependency injection and support for implementing the Model View View Model pattern into the project. I am looking ahead by doing this as I am long over due to update and augment my unit tests.
I then cleaned up the template project by removing all of the files that supported the sample “Item” and “New Item” pages with corresponding adjustments to the BaseViewModel.cs file included in the start up project.
After transferring the code from my real Mobile App Project to the new project I pointed the new mobile app to my unauthenticated service call documented in a previous blog post to verify it worked.
Azure Configuration Steps
With a working mobile application the next step is to start layering in Authentication and Authorization. The first step for that is to create an “App” in the Azure Active Directory. Starting from “Home” on the Azure portal, find and click “Azure Active Directory”. In the left-hand navigation menu select “App registrations” and then click the “+” icon for “New Registration”. The following screen should appear and I have already filled out the form there.

After clicking “Register” the browser will put you in the Overview of the Azure Active Directory Application you just created. Click the “Authentication” item in the left-hand navigation list. Then click the “+” icon for “Add a Platform”.
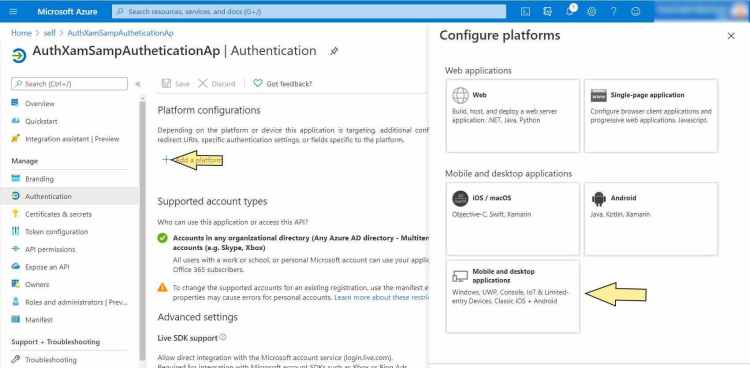
And here is the “Left Turn at Albuquerque” moment. One would think clicking “Android” would be the right answer. It even says “Xamarin” right there on the screen. But going down that path will not yield success. I spent far too long trying to figure out why. In any event clicking on the “Mobile and desktop applications” box will lead us to success and it brings up the following slide out form on the right side.
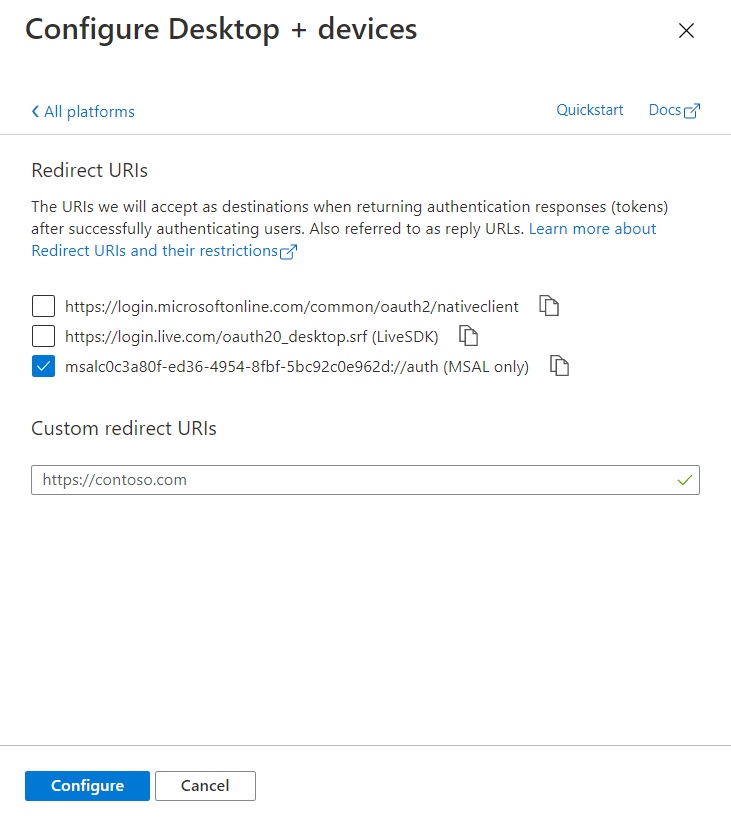
Check the “mscal…” uri for the Return Uri, copy it to the clipboard and save it some where then click Configure.
Now we need to add the API this Azure AD App will access. Click “API Permissions” in the left-hand navigation menu. Above the list that appears on the right side are “tabs” select “APIs my organization uses” and find your Azure Functions API.
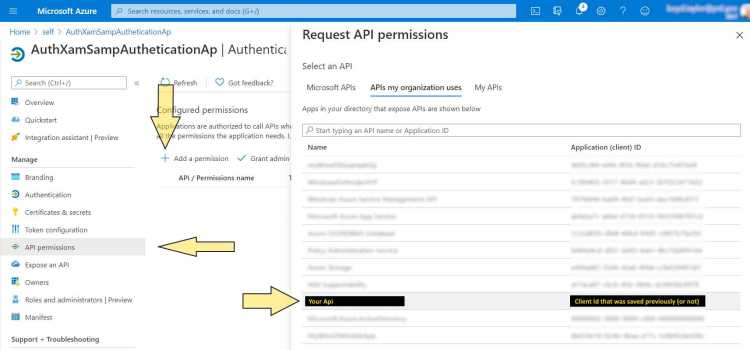
After selecting “Your API” a screen is provided to add “permissions” (aka scopes) for the API in the Azure AD Application.

I am unsure about the selection of the “user_impersonation” role in as much since I had already added it to another app I found it listed in the permissions list. I suspect on first time the permission added the term “user_impersonation” would have to be searched for.
The Azure Ad App is ready to go. Now all we need to do is insure that we have a “user” in the AD and that the user has a “Contributor” role in the Azure Function API. That and configure the Mobile App to use this Azure AD App to access the Function API. And I will document that in the next blog post.
Comments are always appreciated.
