
In this post we continue the process of adding Authentication and Authorization to a “Flyout” Xamarin Forms Application that we started in the previous post. The remaining steps are:
Add AD User and Role to Azure Function API
From the Azure Portal Home page click “Azure Active Directory”. Then click “Users” followed by the “+” for “New user”.
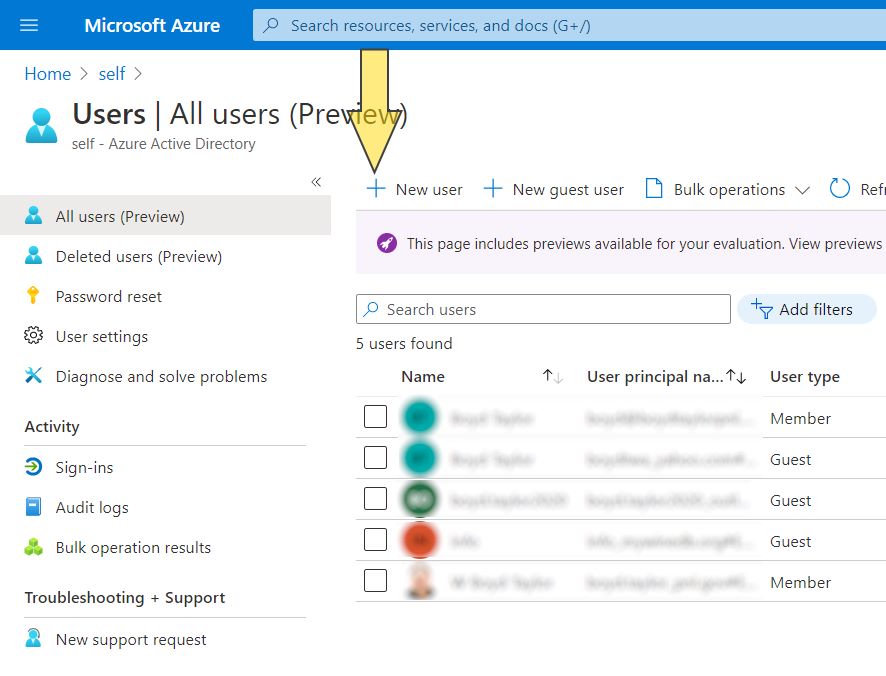
Fill out the user information in the New User Form. Note the domain the user is in as the username must be fully qualified when a login form is presented. Press “Create” when finished.

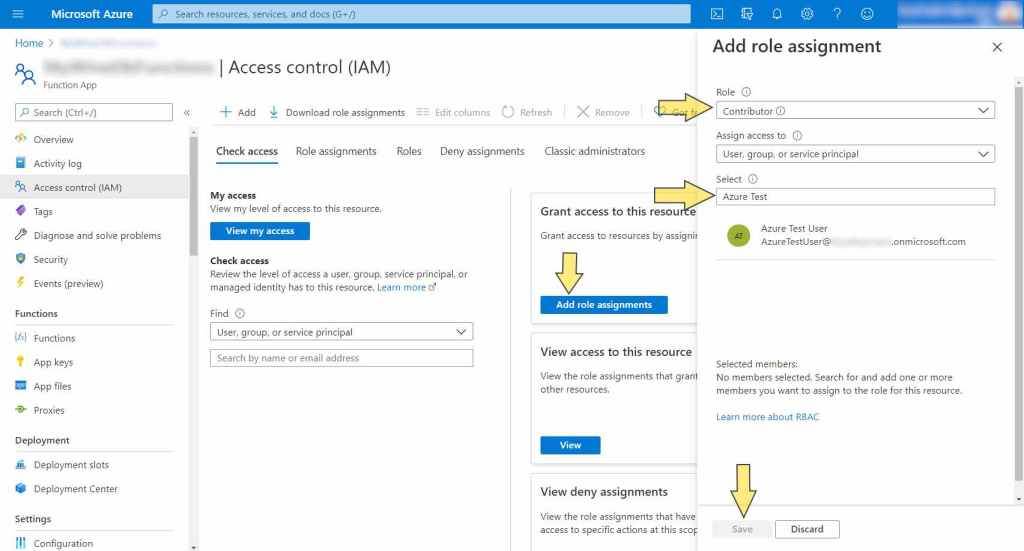
Now that there is a user in the Active Directory, that user needs to have a role in the Function API. From “Home” click on the Function API (note: I am assuming your function API is in the short list of links if not click on Azure Functions and select it from that list)
New Mobile App Project Configuration Steps
The server side of this application has been setup, now it is time to add code to the Mobile Application. First, the Android project needs to be updated. The MainActivity.cs file needs to set the ParentWindow property for the App and the MicrosoftAutheticationService
protected override void OnCreate(Bundle savedInstanceState)
{
…
            App.ParentWindow = this;
            MicrosoftAuthService.ParentWindow = this;
}
Also an event handler routine needs to be overridden to provide values to help the authentication process (note: the existing overridden event handler OnRequestPermissionsResult can be removed. I don’t have multiple roles in the application. If you are in, you are in.)
protected override void OnActivityResult(int requestCode, Result
    resultCode, Intent data)
{
    base.OnActivityResult(requestCode, resultCode, data);
    AuthenticationContinuationHelper
       .SetAuthenticationContinuationEventArgs(requestCode,
            resultCode, data);
}
Finally (for the Android Project), the AndroidManifest.xml file needs to have a few user permissions added to it.
<manifest xmlns:android="http://schemas.android.com/apk/res/android"
     android:versionCode="1" android:versionName="1.0"
     package="org.mywinedb.authxamsam" android:installLocation="auto">
…
    <uses-permission
       android:name="android.permission.AUTHENTICATE_ACCOUNTS" />
    <uses-permission android:name="android.permission.GET_ACCOUNTS" />
    <uses-permission android:name="android.permission.INTERNET" />
    <uses-permission
         android:name="android.permission.MANAGE_APP_TOKENS" />
</manifest>
Turning the focus back to the AuthXamSam project; the App.xaml.cs class needs to registering the services classes (using MvvmLight) for dependency injection and initialize the static class for Authentication services.
Routing.RegisterRoute(nameof(AboutPage), typeof(AboutPage));
SimpleIoc.Default.Register<IWineStore, WineStore>();
SimpleIoc.Default.Register<IMicrosoftAuthService, MicrosoftAuthService>();
SimpleIoc.Default.Register<IMessaging, Messaging>();
SimpleIoc.Default.Register<LoginViewModel>();
SimpleIoc.Default.GetInstance<IMicrosoftAuthService>().Initialize();
MainPage = new LoginPage();
The application starts on the LoginPage.xaml which just contains a button where the Text attribute is bound to the LoginViewModel.cs ButtonText property which is toggled between “Login” and “Logout” inside the tasks SignInAsync() and SignOutAsync()
public async Task SignInAsync()
{
    try
    {
        var storedToken = await SecureStorage.GetAsync("tokenAuthXamSam");
        if (storedToken != null)
        {
            await SignOutAsync();
            return;
        }
        IsLoading = true;
        User = await microsoftAuthService.OnSignInAsync();
        ButtonTextCommand.Execute(null);
        IsLoading = false;
        App.Current.MainPage = new AppShell();
    }
    catch (Exception ex)
    {
        System.Diagnostics.Debug.WriteLine(ex.ToString());
        await messenger.ShowMessageAsync("Authentication Error",
            $"Failed to Sign In. Message: {ex.Message}");
    }
The LoginCommand always calls the SignInAsync() task in the view model. The Xamarin Essentials Secure Storage object is checked to see if an authorization token exists (under normal circumstances when starting up, it will not exist) and based on that the view model will either continue with the Sign In Process or execute the SignOutAsync() task. The ButtonText property is set using The ButtonTextCommand which executes the SetButtonTextAsync() task which will update the ButtonText property to say either say Login or Logout.
public LoginViewModel(IMicrosoftAuthService MicrososoftAuthService)
{
    microsoftAuthService = MicrososoftAuthService;
    messenger = SimpleIoc.Default.GetInstance<IMessaging>();
    LoginCommand = new RelayCommand(async () => await SignInAsync());
    ButtonTextCommand = new RelayCommand(async () => await
    SetButtonText());
    ButtonTextCommand.Execute(null);
}

public async Task SetButtonText()
{
    var isAutheticated = await SecureStorage.GetAsync("tokenAuthXamSam");
    ButtonText = isAutheticated != null ? "Logout" : "Login";
}
Assuming the application is logging in, the SignInAsync() task calls a method in the MicrosoftAutheticationService called OnSignInAsync(). Where the Access Token is created and/or refreshed and loaded into the Secure Storage object and a User object is returned with user meta data as shown below.
public void Initialize()
{
    PCA = PublicClientApplicationBuilder.Create(ClientID)
            .WithRedirectUri($"msal{ClientID}://auth")
            .Build();
}

public async Task<User> OnSignInAsync()
{
    var accounts = await PCA.GetAccountsAsync();
    try
    {
        try
        {
            var firstAccount = accounts.FirstOrDefault();
            var authResult = await PCA.AcquireTokenSilent(Scopes,
                firstAccount).ExecuteAsync();
            string accessToken = authResult.AccessToken;
            await SecureStorage.SetAsync("tokenAuthXamSam", accessToken);
            string idToken = authResult.IdToken;
            RefreshUserDataAsync(authResult?.AccessToken);
        }
        catch (MsalUiRequiredException ex)
        {
            System.Diagnostics.Debug.WriteLine(ex.ToString());
            // the user was not already connected.
            try
            {
                var parentWindow = App.ParentWindow;

                var authResult = await PCA.AcquireTokenInteractive(Scopes)
                            .WithUseEmbeddedWebView(true) //Added this …
                            .WithParentActivityOrWindow(parentWindow)
                            .ExecuteAsync();

                string accessToken = authResult.AccessToken;
                await SecureStorage.SetAsync("tokenAuthXamSam"
                            , accessToken);
                …
            }
            …
         }
         …
    }
}
With the authorization token in hand, the view model navigates to the AppShell.cs page that displays the CellarPage.xaml (because it is first in the list of navigation links) where the View Model retrieves the token and makes a call to the WineStore.cs service as follows
var token = SecureStorage.GetAsync("tokenAuthXamSam").Result;
HttpRequestMessage message =
   new HttpRequestMessage(HttpMethod.Get, cellarSummaryUri);
message.Headers.Authorization =
   new System.Net.Http.Headers.AuthenticationHeaderValue("Bearer", token);
var response = await client.SendAsync(message);
The authenticated service call populates the drop down list with the Cellar information that has been documented in previous posts using an unauthenticated service.
The SignOutAsync() task is very simple. The authorization token is removed from Secure Storage and the ButtonText property is updated.
This simple application is far from bullet proof but the concept works. I have published this application to my git hub repository. You can use it in tandem with the API project that has already been published to recreate this process.
With authorization now in place I can work on API calls that create, modify and delete data. But first I think I will catch up with the unit tests for this project that have been ignored for far too long.
Comments are always appreciated.

2 thoughts on “…You Get the Horns Part 2”